(OpenCV-Python) Build OpenCV 4.0.1-dev + contrib + non-free (SIFT,SURF) from sources on Windows 10 64-bit OS

Tags

, , , , , ,

Since changing from OpenCV C++ to OpenCV-Python, my programming life with OpenCV became a lot easier. If downloading an OpenCV’s wheel (.whl) from https://www.lfd.uci.edu/~gohlke/pythonlibs/ and pip install it, was still not easy enough, there was a super-convenient PyPi package (https://pypi.org/) that allowed us to install an unofficial pre-built OpenCV with a single command line:

pip install opencv-contrib-python

However, since September 2018, there were changes. The opencv-contrib-python package was no longer including non-free algorithms like SIFT and SURF. Thinking of SIFT as one of important state-of-the-arts in computer vision, I decided to give it a try—to build all OpenCV from sources in Windows OS.

Although building OpenCV from sources was a kind of nightmares in my old days of OpenCV C++ on Windows OS, this time, I got it. After many hours of googling and CMaking, finally I am able to build OpenCV-Python (including contrib and non-free modules) from sources. And this blog is a memo of how I did it.

Before we start, I want to thank to these two tutorials for their great documents:

:::::::: STEP 0: Get ready ::::::::

Here is a list of what required to build OpenCV-Python from sources (referring to my laptop environment):

  1. Windows OS. Mine is Windows 10 Enterprise N 64-bit.
  2. Microsoft Visual C++ 14 (2015) or 15 (2017). Mine is Microsoft Visual Studio Community 2017 (version 15.9.5) with Visual C++ 2017. As a community version, there is a 30-day free trial limitation. Once expired, you may need another Microsoft account to continue using this VS community version.
  3. Python interpreter from https://www.python.org/downloads/. Mine is Python 3.6.8 x64 installed at C:\Python\Python368-64\ (with pip properly installed). Although there are Python 3.7.x available at the time of this blog, I am sticking with Python 3.6 as it is still a requirement of TensorFlow library.
  4. CMake for Windows from https://cmake.org/download/. Mine is CMake 3.13.2 (win64-x64).

Make sure that everything listed above is installed and works correctly. Then create an empty folder to store our to-be-built OpenCV. For me, I created three new empty folders in the following structure:
          C:\opencv401_contrib
          C:\opencv401_contrib\source
          C:\opencv401_contrib\build

To avoid possible conflicts, I think it is a good idea to uninstall any existing OpenCV-Python from the computer before continuing to STEP1. For me, I did this by executing two commands in Windows command prompt: (Note:- if you use a different PyPi package of OpenCV, just uninstall it)

pip uninstall opencv-python
pip uninstall opencv-contrib-python

At this point, my laptop was clean and free from any OpenCV-Python installation, meaning that I got an error when trying to import OpenCV library in Python with

import cv2

:::: Update on May 21, 2019 ::::

On another OpenCV-Python setup, I just discovered that installation directories of Python and/or OpenCV DO MATTER with this blog.

It was the case when I put both the Python installation directory and the opencv401_contrib folder under C:\Program Files\. At first, there seemed to be no problem as long as I chose to run Command Prompt, CMake and Visual Studio as an administrator. However, once I finished STEP3.3 (with no error at all) and tried the code snippets in STEP4, Python returned an error saying that ‘cv2’ module is not known.

After careful inspection, I found that, despite of no build error in Visual Studio, there were some missing files in STEP3.2-3.3. Somehow Visual Studio skipped building some files including the important ‘cv2’ folder that links my compiled OpenCV to the Python environment.

My working solution is to completely uninstall Python and delete opencv401_contrib folder from C:\Program Files\. Then, reinstall them both to C:\ or wherever directory that does not require Run-as-Administrator.

:::::::: STEP 1: Download OpenCV sources ::::::::

It is time to download OpenCV’s sources from Github. In order to include contrib and non-free modules, there are two zip files to be downloaded:

Unzip (Extract Here) both downloaded files into C:\opencv401_contrib\source. The result on my laptop looks like this:

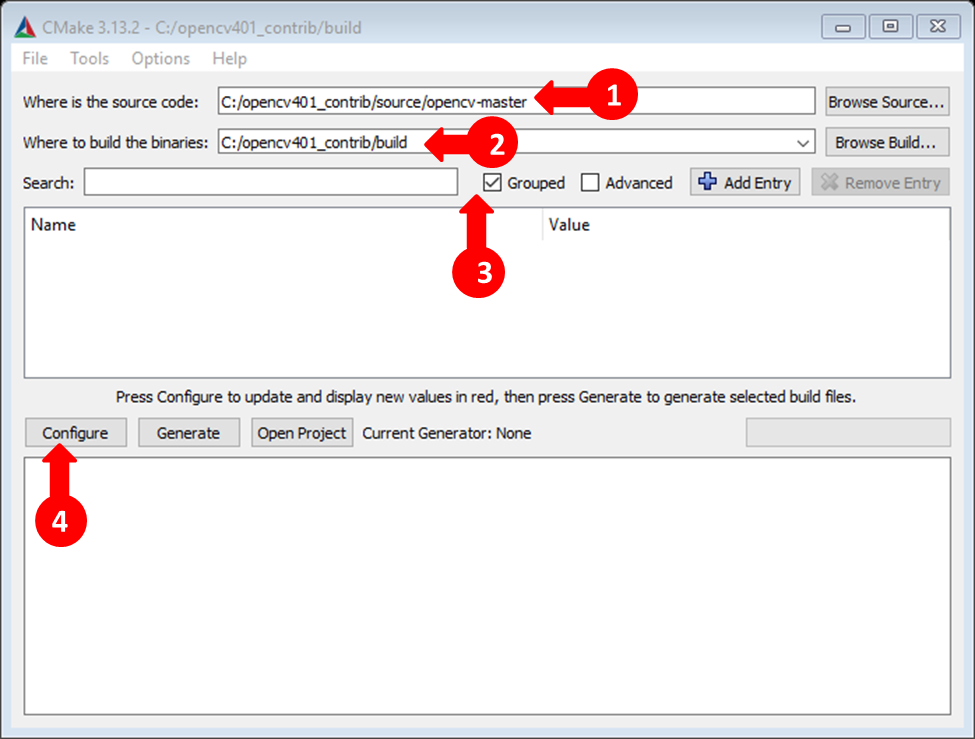
:::::::: STEP 2: Make Visual Studio project with CMake ::::::::

Open CMake-GUI and choose File > Delete Cache to clear any previous history. I always do this whenever I make some mistake in configuring CMake and want to restart all over again.

Then do the following steps in CMake-GUI: (Be careful not to include backslash in any CMake’s file directory, use slash instead) 

  1. Browse Source… > C:/opencv401_contrib/source/opencv-master
  2. Browse Build… > C:/opencv401_contrib/build
  3. Check Grouped box.
  4. Click Configure.
  5. When clicking Configure for the first time, CMake will ask us to specify which generator to be used. For my laptop, I chose Visual Studio 14 2015 x64.
  6. When (the first) configuring finishes, in OPENCV group, check OPENCV_ENABLE_NONFREE to include SIFT and SURF.
  7. In OPENCV group, set OPENCV_EXTRA_MODULES_PATH to C:/opencv401_contrib/source/opencv_contrib-master/modules. This is in order to include extra modules (opencv_contrib) of OpenCV.
  8. In OPENCV group, check OPENCV_PYTHON3_VERSION.
  9. Click Configure again. If everything goes well, there will be the following messages in CMake log. The OpenCV Module: To be built: will include a long list saying aruco bgsegm bioinspired calib3d ccalib core datasets dnn dnn_objdetect dpm face features2d flann fuzzy gapi hfs highgui img_hash imgcodecs imgproc java_bindings_generator line_descriptor ml objdetect optflow phase_unwrapping photo plot python3 python_bindings_generator reg rgbd saliency shape stereo stitching structured_light superres surface_matching text tracking ts video videoio videostab xfeatures2d ximgproc xobjdetect xphoto.
  10. Finally, click Generate to create Visual C++ solution for OpenCV. The generation will take few seconds. When done, there will be a lot of files in C:\opencv410_contrib\build including ALL_BUILD.vcxproj.

:::::::: STEP 3: Use Visual C++ to build OpenCV from sources ::::::::

Open ALL_BUILD.vcxproj from STEP2 in Microsoft Visual Studio (for OpenCV 4.0.1, at least VC 14 2015 or VC 15 2017 is required).

  1. Change the build mode of Visual C++ from Debug to Release. Also, make sure that the next drop-down-box is set to x64.
  2. In solution explorer, right click at the ALL_BUILD project and select Build. Please be patient because this step of building OpenCV from sources, will take a long time (25 minutes for me). In my laptop, it finished building with the VS message saying “Build: 148 succeeded, 0 failed, 0 up-to-date, 0 skipped”.
  3. Finally, in solution explorer, right click at the INSTALL project and select Build. This step takes just a few seconds to finish. In my laptop, it finished installing with the VS message saying “Build: 2 succeeded, 0 failed, 147 up-to-date, 0 skipped”. (Update on May 21, 2019) To confirm that OpenCV is properly installed to the existing Python environment, navigate to the Python installation directory and look for a folder named \Lib\site-packages\cv2. Without this cv2 folder (and its contents), OpenCV becomes an unknown module for Python.

Now our OpenCV-Python should be ready for use.

:::::::: STEP 4: Test OpenCV-Python and SIFT/SURF ::::::::

Open your Python IDE and try the following code snippets, if OpenCV-Python is installed correctly, there should be no error at import cv2. And if non-free module is successfully included, the last two commands of SIFT and SURF should generate no error.

import cv2
print( cv2.__version__ )

detector1 = cv2.xfeatures2d.SIFT_create()
detector2 = cv2.xfeatures2d.SURF_create()

Install OpenCV 2.4.10 and use it in MSVC 2013 and Qt 5.4.0 of Windows 8.1, 64-bit OS, x64-based processor

Tags

, , , ,

Welcome to a veryyyy long tutorial of mine (again).

Installing OpenCV in a brand new computer has never been straightforward for me in a past decade. I just got this new laptop which happens to be my first 64-bit Windows OS computer. And as expected, setting up OpenCV and Qt on 64-bit Windows OS took me many frustating hours.

Some problems seemed to be very big deals that were about to take me forever to work them out. But somehow I was able to get them right finally. Some solutions are incredibly simple but totally unexpected; something I’ve never imagined that it can cause me these problems.

As everything is working now, I want to again share this step-by-step experience to you and also to my students, who hopelessly gave up half way as they could not make OpenCV in Qt (or even Qt only) work under Windows 64-bit environment.

My laptop:: Windows 8.1 Enterprise N, 64-bit OS, x64-based processor

:::::::::::: STEP 1: Install Microsoft Visual C++ 2013 :::::::::::::

1 ) Install Microsoft Visual Studio Ultimate 2013 to C:\Program Files (x86)\Microsoft Visual Studio 12.0 .

2 ) Make sure that your copy of MSVC 2013 is running ok by creating a new empty Win32 console application and executing some simple C++ codes. Try both debug and release modes, as well as try debugging the codes using MSVC’s debugger.

#include <stdio.h>
int main()
{
	for (int i = 0; i < 100000; i++)
		printf("%d. Hello world\n", i);
	return 0;
}

3 ) Once your MSVC2013 is working fine for none-OpenCV C++ programming, you are ready for the next step.

:::::::::::: STEP 2: Install OpenCV 2.4.10 for Windows ::::::::::::

1 ) Download a free copy of prebuilt OpenCV 2.4.10 for Windows (367.3 MB) from http://opencv.org/downloads.html.

2 ) In my laptop, I extracted the file to C:\opencv2410 as shown below.

dec2014_pic1

3 ) Add OpenCV’s bin directory (in where *.dll files are) to PATH environment variable. This is an unexpectedly tricky step that caused me many troubles in later OpenCV’s as well as Qt’s settings.

Mainly, there are 3 ways that I tried; each gave me different results. (Alternative 3 is the one that finally works for me)

  • Alternative 1: Go to Environment Variables > System variables: Path > click Edit. Then append C:\opencv2410\build\x86\vc12\bin; to the end of the list (don’t forget using ; to separate each entry).
      
    dec2014_pic2

    In my laptop, adding OpenCV’s bin directory to the end of PATH did not work. Somehow, MSVC2013 kept showing me an error saying that opencv_XXXX.dll is missing from your computer, despite of my hopeless attempt to restart the computer.

  • Alternative 2: This is almost the same as Alternative 1. But instead of appending C:\opencv2410\build\x86\vc12\bin; to the end of PATH’s list, I inserted it at the very beginning. This way, OpenCV’s bin directory is the first entry found in system’s PATH variable. I know that this solution sounds weirdly unreasonable. But it has worked like a magic for my past decade of using OpenCV in MSVC environment.
        
    So if your plan is to develop OpenCV in MSVC, this alternative may be the one for you. However, using this alternative led me to another hopeless problem in Qt Creator (more detail in STEP 4.5.1). So I had no choice but to move to Alternative 3.
  • Alternative 3: Instead of adding OpenCV’s bin directory to system’s PATH variable, I added it to user profile’s PATH variable, hoping that this could help avoid conflict with Qt Creator (see detail in STEP 4.5.1). And, HOORAYYYY, it worked, for both OpenCV in MSVC 2013 and OpenCV in Qt 5.4.0!!! Below is a screenshot of how I did this:
      
    dec2014_pic3

    Above picture shows a small and convenient program that helps me to easily set Windows’ environment variables. It is called PathEditor.exe downloaded for free from http://patheditor.codeplex.com/. BTW, you do not need to use this program; editing PATH using a traditional Windows style gives the same result.


4 ) Restart the computer for the change in 3 to take effect (sometimes you may need to restart your computer more than once).

::::::::::: STEP 3: Use OpenCV 2.4.10 in MSVC 2013 :::::::::::

If you have no plan to develop an OpenCV program under MSVC environment, you may skip this step and go to STEP 4 of setting up Qt right away. But I personally prefer ensuring that every prerequisite tool/library is working just fine before going to the next one.

1 ) Open Microsoft Visual Studio 2013 and create a new VC++ project (an empty Win32 console application).

2 ) Open Property Manager window by choosing VIEW > Other Windows > Property Manager menu.

dec2014_pic4

Below is a screenshot of how the Property Manager look like.

dec2014_pic5

3 ) In Property Manager window, create a property sheet for running OpenCV in Debug mode by right clicking at Debug | Win32 and choose Add New Project Property Sheet. For me, I named the new property sheet OPENCV_DEBUG.props .

4 ) Right click at the newly created OPENCV_DEBUG property sheet and choose Properties menu.

dec2014_pic6

5 ) Add (do not delete existing values) the following values to the OPENCV_DEBUG property sheet:

  1. VC++ Directories
    • Executable Directories: C:\opencv2410\build\x86\vc12\bin
    • Library Directories: C:\opencv2410\build\x86\vc12\lib
  2. C/C++ > General
    • Additional Include Directories: C:\opencv2410\build\include
  3. Linker > General
    • Additional Library Directories: C:\opencv2410\build\x86\vc12\lib
  4. Linker > Input
    • Additional Dependencies:
            opencv_core2410d.lib
            opencv_highgui2410d.lib
            opencv_imgproc2410d.lib
            opencv_video2410d.lib

      You may add more libraries here, depending on OpenCV’s commands being used.

  
6 ) Back to Property Manager window, now create a property sheet for running OpenCV in Release mode by right clicking at Release | Win32 and choose Add New Project Property Sheet; I named this property sheet OPENCV_RELEASE.props .

dec2014_pic7

7 ) Add (do not delete existing values) the following values to the OPENCV_RELEASE property sheet. They are almost the same as done for OPENCV_DEBUG setting, except for library’s names in Additional Dependencies.

  1. VC++ Directories
    • Executable Directories: C:\opencv2410\build\x86\vc12\bin
    • Library Directories: C:\opencv2410\build\x86\vc12\lib
  2. C/C++
    • Additional Include Directories: C:\opencv2410\build\include
  3. Linker > General
    • Additional Library Directories: C:\opencv2410\build\x86\vc12\lib
  4. Linker > Input
    • Additional Dependencies:
            opencv_core2410.lib
            opencv_highgui2410.lib
            opencv_imgproc2410.lib
            opencv_video2410.lib

      You may add more libraries, depending on OpenCV’s commands being used.

  
8 ) Add a new main.cpp file to your project. Then put some OpenCV codes in that file.

#include <stdio.h>
#include <opencv2/core/core.hpp>
#include <opencv2/highgui/highgui.hpp>

int main()
{
  // Load an existing image (make sure that the input URL really exists in your computer)
  cv::Mat pic = cv::imread( "C:\\somepic.jpg", CV_LOAD_IMAGE_COLOR );  

  cv::VideoCapture capture(0);       // open a first USB camera found (0-based camera index)
  if (!capture.isOpened())           // if camera not found, display an error message
     printf("Error: cannot open a camera\n");

  cv::Mat cam;
  while (true)
  {
     if ( capture.isOpened() )
 	capture >> cam;                   // read a next frame from camera live stream

     cv::imshow("Still image", pic);      // display the still image on a window

     if ( !cam.empty() )
	cv::imshow("Camera image", cam);  // display live camera stream on another window

     if (cv::waitKey(1) == 27)            // exit this loop when ESC was pressed
	break;
  }

  return 0;
}

9 ) A moment of truth, try running your project in both Debug and Release modes. If success (using my sample codes above), there will be two windows displayed: one showing a still image and the other showing live camera stream.

List of frequently found errors

  1. The program can’t start because opencv_XXXX.dll is missing from your computer
    • Cause: Somehow MSVC cannot find where your OpenCV’s dll files are.
    • Solution: (check it step-by-step from top to bottom)
      1. Make sure that C:\opencv2410\build\x86\vc12\bin; is a valid directory in your computer and that the directory was properly added to Windows’ environment variable (see STEP 2.3 for more tricky detail).
      2. Make sure that the opencv_XXXX.dll file really exists in your computer at the directory mentioned above. If the directory is valid but the dll file is not found inside, you may need to reinstall your OpenCV.
      3. After all, if the problem still remains, my last suggestion is to copy all necessary OpenCV’s dll files to the same directory where your *.exe (built by MSVC) is running in.
  2. fatal error C____: cannot open include file: ‘opencvXXXX.hpp’: no such file or directory or error C____ ‘xxxx’ is not a member of ‘cv’ or error C____ ‘xxxx’ undeclared identifier or error C____ ‘xxxx’ identifier not found
    • Cause: Some necessary header files are missing.
    • Solution: (check it step-by-step from top to bottom)
      1. Make sure that you set the correct and valid directory of OpenCV’s include folder during STEP 3.5.2 and STEP 3.7.2.
      2. Check OpenCV’s documentation for a name of header file required by the OpenCV’s command causing this error. Then, ensure that you have already added that header to the top of your code using #include <opencv2/xxxx/xxxx.hpp> .
      3. After all, if the problem still remains, browse your OpenCV’s include folder (C:\opencv2410\build\include for my laptop) to ensure that the header file really exists. Otherwise, you may need to reinstall OpenCV to recover it.
  3. error LNK____: unresolved external symbol
    • Cause: Some library required by your used OpenCV’s command is missing.
    • Solution: (check it step-by-step from top to bottom)
      1. Make sure that you set the correct and valid directory of OpenCV’s library folder during STEP 3.5.1 and STEP 3.7.1.
      2. Check OpenCV’s documentation for a name of library required by the OpenCV’s command causing this error. Then, ensure that you have already added that library to your project (following STEP 3.5.4 and 3.7.4).
      3. After all, if the problem still remains, browse your OpenCV’s library folder (C:\opencv2410\build\x86\vc12\lib for my laptop) to ensure that the library really exists. Otherwise, you may need to reinstall OpenCV to recover it.

  
:::::::::::: STEP 4: Install Qt 5.4.0 for Windows ::::::::::::

If you want something to help create a beautiful GUI in C++, something that is easy to use, something that can be shared among different OSs or platforms, my suggestion is to put QT at the very top of your list. Although I started using QT just a few months ago, I have to say that I totally love it. Of course, it causes me more works and troubles during installation, but what I’ve got is really worth.

No more introduction. Let’s start getting QT to work in your 64-bit Windows OS.

1 ) Download free Qt 5.4.0 for Windows 32-bit (VS 2013, OpenGL, 694 MB) from http://www.qt.io/download-open-source/.

Note: At first, I downloaded Qt 5.4.0 for Windows 64-bit (VS 2013, OpenGL) but it did not work (more detail in STEP 4.5.2).

2 ) Install Qt Creator 5.4.0 at C:\Qt\Qt5.4.0 and launch it as shown below.

dec2014_pic8

3 ) Create a new project of type Qt Console Application. The 32-bit MSVC2013 Debug and Release compilers should be detected automatically in Kit Selection as shown below. Otherwise, you have to manually specify them later.

dec2014_pic9

4 ) In *.cpp file, write simple C++ codes (like those in STEP 1.2) to test whether Qt is working fine for none-OpenCV C++ programming.

5 ) Run the project in both debug and release modes. Also try debugging it too to make sure that the debugger tool is working just fine.

List of frequently found errors

  1. ‘cl’ is not recognized as an internal or external command, operable program or batch file
    • Cause: Somehow the system cannot find C:\Windows\System32 in system’s PATH variable. In consequent, Qt cannot find where cl.exe (MSVC command line prompt which is required by QT) is.
    • Solution: Make sure that C:\Windows\System32 is in the system’s PATH variable list and that it appears as “the first entry of the list.” The latter part of problem corresponds to the tricky part that I mentioned earlier in STEP 2.3.
  2. LNK1112 module machine type ‘x86’ conflicts with target machine type ‘x64’
    • Cause: Mismatch between version of MSVC compiler and Qt Creator.
    • Solution: In my laptop, uninstalling Qt 5.4.0 for Windows 64-bit (VS 2013, OpenGL) and reinstalling Qt 5.4.0 32-bit (VS 2013, OpenGL) solved this problem.
  3. No debugger setup
    • Cause: Debugging Tools for Windows are missing. (These tools are not included in MSVS 2013 installation)
    • Solution: (step-by-step)
      1. Download Standalone Debugging Tools for Windows (WinDbg) installer from http://msdn.microsoft.com/en-us/windows/hardware/hh852365.
      2. Install it (you may choose to install only the debugger and uncheck the others to reduce downloading time).
      3. Relaunch Qt Creator, and choose Tools > Option > Debuggers menu where you will see cdb.exe debugger automatically detected in C:\Program Files (x86)\Windows Kits\8.1\Debuggers directory.

  
:::::::::::: STEP 5: Use OpenCV 2.4.10 in Qt 5.4.0 ::::::::::::

Finally, we are about to go for the last step.

1 ) Create a new project or edit the project created in STEP 4 so that the *.cpp file contains OpenCV test codes (my example codes in STEP 3.8).

2 ) Append the following codes to the bottom of yourProjectName.pro file.

win32 {
    INCLUDEPATH += "C:\\opencv2410\\build\\include" \

    CONFIG(debug,debug|release) {
        LIBS += -L"C:\\opencv2410\\build\\x86\\vc12\\lib" \
            -lopencv_core2410d \
            -lopencv_highgui2410d \
            -lopencv_imgproc2410d \
            -lopencv_features2d2410d \
            -lopencv_calib3d2410d
    }

    CONFIG(release,debug|release) {
        DEFINES += QT_NO_WARNING_OUTPUT QT_NO_DEBUG_OUTPUT
        LIBS += -L"C:\\opencv2410\\build\\x86\\vc12\\lib" \
            -lopencv_core2410 \
            -lopencv_highgui2410 \
            -lopencv_imgproc2410 \
            -lopencv_features2d2410 \
            -lopencv_calib3d2410
    }
}

In future use, do not forget to include additional libraries required by your project here using the above format.

3 ) Choose Build > Run qmake menu. You should do this every time there are changes made to *.pro file.

4 ) Run the project in both debug and release modes. Also try debugging it too to make sure that the debugger tool is working just fine.

List of frequently found errors

Mostly they are the same as those errors explained at the end of STEP 3 and 4.

But in Qt, setting OpenCV’s include directory, OpenCV’s library directory and dependency libraries is easier (less number of clicks) and more flexible than MSVC, just specifying them in *.pro file following the format shown in STEP 5.2.


Well, this is all about my hard work during Xmas 2014. Merry Christmas and Happy New Year though 😉

Continue reading